前言
现代 C++ 教程:高速上手 C++ 11/14/17/20(第二版) 是欧长坤 (hi[at]changkun.de ) 用中文写的。
本人的笔记对应的书籍最后更新时间为 2022 年 7 月 17 日。
本书的官网为 https://changkun.de/modern-cpp/ 。可以在线阅读或者下载 PDF 版本。
本书 GitHub 的地址为 https://github.com/changkun/modern-cpp-tutorial 。
本书 code 的地址为 https://github.com/changkun/modern-cpp-tutorial/tree/master/code 。
本书 exercises 的地址为 https://github.com/changkun/modern-cpp-tutorial/tree/master/exercises 。
操作系统:Windows 10 专业版
参考文档
现代 C++ 教程:高速上手 C++ 11/14/17/20(第二版)
第 3 章 语言运行期的强化
Lambda 表达式
Lambda 表达式是现代 C++ 中最重要的特性之一,而 Lambda 表达式,实际上就是提供了一个类似匿名函数的特性,而匿名函数则是在需要一个函数,但是又不想费力去命名一个函数的情况下去使用的。这样的场景其实有很多很多,所以匿名函数几乎是现代编程语言的标配。
基础
Lambda 表达式的基本语法如下:
1
2
3
[捕获列表](参数列表) mutable (可选) 异常属性 -> 返回类型 { }
上面的语法规则除了 [捕获列表] 内的东西外,其他部分都很好理解,只是一般函数的函数名被略去,返回值使用了一个 -> 的形式进行(我们在上一节前面的尾返回类型已经提到过这种写法了)。
所谓捕获列表,其实可以理解为参数的一种类型,Lambda 表达式内部函数体在默认情况下是不能够使用函数体外部的变量的,这时候捕获列表可以起到传递外部数据的作用。根据传递的行为,捕获列表也分为以下几种:
1. 值捕获
与参数传值类似,值捕获的前提是变量可以拷贝,不同之处则在于,被捕获的变量在 Lambda 表达式被创建时拷贝,而非调用时才拷贝:
1
2
3
4
5
6
7
8
9
10
11
void lambda_value_capture () int value = 1 ; auto copy_value = [value] { return value; }; value = 100 ; auto stored_value = copy_value (); std::cout << "stored_value = " << stored_value << std::endl; }
2. 引用捕获
与引用传参类似,引用捕获保存的是引用,值会发生变化。
1
2
3
4
5
6
7
8
9
10
11
void lambda_reference_capture () int value = 1 ; auto copy_value = [&value] { return value; }; value = 100 ; auto stored_value = copy_value (); std::cout << "stored_value = " << stored_value << std::endl; }
3. 隐式捕获
手动书写捕获列表有时候是非常复杂的,这种机械性的工作可以交给编译器来处理,这时候可以在捕获列表中写一个 & 或 = 向编译器声明采用引用捕获或者值捕获。
总结一下,捕获提供了 Lambda 表达式对外部值进行使用的功能,捕获列表的最常用的四种形式可以是:
4. 表达式捕获
上面提到的值捕获、引用捕获都是已经在外层作用域声明的变量,因此这些捕获方式捕获的均为左值,而不能捕获右值。
C++14 给与了我们方便,允许捕获的成员用任意的表达式进行初始化,这就允许了右值的捕获,被声明的捕获变量类型会根据表达式进行判断,判断方式与使用 auto 本质上是相同的:
1 2 3 4 5 6 7 8 9 10 11 #include <iostream> #include <memory> #include <utility> void lambda_expression_capture () auto important = std::make_unique <int >(1 ); auto add = [v1 = 1 , v2 = std::move (important)](int x, int y) -> int { return x+y+v1+(*v2); }; std::cout << add (3 ,4 ) << std::endl; }
在上面的代码中,important 是一个独占指针,是不能够被 “=” 值捕获到,这时候我们可以将其转移为右值,在表达式中初始化。
泛型 Lambda
从 C++14 开始,Lambda 函数的形式参数可以使用 auto 关键字来产生意义上的泛型:
1
2
3
4
5
6
auto add = [](auto x, auto y) { return x+y; }; add (1 , 2 );add (1.1 , 2.2 );
Files
运行开始菜单的 “MSYS2 MinGW Clang x64”,运行下面命令构建项目目录。
1
2
3
cd /f/vscode/cpp_projects/modern-cpp-tutorial/code/ mkdir 3 cd 3/
创建 3.1.lambda.basic.cpp 文件,粘贴下面代码。
1 2 3 4 5 6 7 8 9 10 11 12 13 14 15 16 17 18 19 20 21 22 23 24 25 26 27 28 29 30 31 32 33 34 35 36 37 38 39 40 41 42 43 44 45 46 47 48 49 50 51 52 53 54 55 56 57 #include <iostream> #include <memory> #include <utility> void lambda_value_capture () int value = 1 ; auto copy_value = [value] { return value; }; value = 100 ; auto stored_value = copy_value (); std::cout << "stored_value = " << stored_value << std::endl; } void lambda_reference_capture () int value = 1 ; auto copy_value = [&value] { return value; }; value = 100 ; auto stored_value = copy_value (); std::cout << "stored_value = " << stored_value << std::endl; } void lambda_expression_capture () auto important = std::make_unique <int >(1 ); auto add = [v1 = 1 , v2 = std::move (important)](int x, int y) -> int { return x+y+v1+(*v2); }; std::cout << add (3 ,4 ) << std::endl; } void lambda_generic () auto generic = [](auto x, auto y) { return x+y; }; std::cout << generic (1 , 2 ) << std::endl; std::cout << generic (1.1 , 2.2 ) << std::endl; } int main () lambda_value_capture (); lambda_reference_capture (); lambda_expression_capture (); lambda_generic (); return 0 ; }
创建 Makefile 文件,粘贴下面代码。
1 2 3 4 5 6 7 8 9 10 all: $(patsubst %.cpp, %.out, $(wildcard *.cpp)) %.out: %.cpp Makefile clang++ $< -o $@ -std=c++2a -pedantic clean: rm *.out
1
2
3
4
5
6
7
lyf@DESKTOP-GV2QHKN CLANG64 /f/vscode/cpp_projects/modern-cpp-tutorial/code/3 $ tree . ├── 3.1.lambda.basic.cpp └── Makefile 0 directories, 2 files
1
2
3
4
5
6
7
8
9
10
11
12
13
14
15
16
17
18
19
20
21
22
23
24
25
26
27
28
29
30
lyf@DESKTOP-GV2QHKN CLANG64 /f/vscode/cpp_projects/modern-cpp-tutorial/code/3 $ ls 3.1.lambda.basic.cpp Makefile lyf@DESKTOP-GV2QHKN CLANG64 /f/vscode/cpp_projects/modern-cpp-tutorial/code/3 $ make clang++ 3.1.lambda.basic.cpp -o 3.1.lambda.basic.out -std=c++2a -pedantic lyf@DESKTOP-GV2QHKN CLANG64 /f/vscode/cpp_projects/modern-cpp-tutorial/code/3 $ ls 3.1.lambda.basic.cpp 3.1.lambda.basic.out Makefile lyf@DESKTOP-GV2QHKN CLANG64 /f/vscode/cpp_projects/modern-cpp-tutorial/code/3 $ ./3.1.lambda.basic.out stored_value = 1 stored_value = 100 9 3 3.3 lyf@DESKTOP-GV2QHKN CLANG64 /f/vscode/cpp_projects/modern-cpp-tutorial/code/3 $ make clean rm *.out lyf@DESKTOP-GV2QHKN CLANG64 /f/vscode/cpp_projects/modern-cpp-tutorial/code/3 $ ls 3.1.lambda.basic.cpp Makefile lyf@DESKTOP-GV2QHKN CLANG64 /f/vscode/cpp_projects/modern-cpp-tutorial/code/3 $
函数对象包装器
这部分内容虽然属于标准库的一部分,但是从本质上来看,它却增强了 C++ 语言运行时的能力,这部分内容也相当重要,所以放到这里来进行介绍。
std::function
Lambda 表达式的本质是一个和函数对象类型相似的类型(称为闭包类型)的对象(称为闭包对象),当 Lambda 表达式的捕获列表为空时,闭包对象还能够转换为函数指针值进行传递,例如:
1 2 3 4 5 6 7 8 9 10 11 12 13 14 15 #include <iostream> using foo = void (int ); void functional (foo f) f (1 ); } int main () auto f = [](int value) { std::cout << value << std::endl; }; functional (f); f (1 ); return 0 ; }
上面的代码给出了两种不同的调用形式,一种是将 Lambda 作为函数类型传递进行调用,而另一种则是直接调用 Lambda 表达式,在 C++11 中,统一了这些概念,将能够被调用的对象的类型,统一称之为可调用类型。而这种类型,便是通过 std::function 引入的。
C++11 std::function 是一种通用、多态的函数封装,它的实例可以对任何可以调用的目标实体进行存储、复制和调用操作,它也是对 C++ 中现有的可调用实体的一种类型安全的包裹(相对来说,函数指针的调用不是类型安全的),换句话说,就是函数的容器。当我们有了函数的容器之后便能够更加方便的将函数、函数指针作为对象进行处理。例如:
1 2 3 4 5 6 7 8 9 10 11 12 13 14 15 16 17 18 #include <functional> #include <iostream> int foo (int para) return para; } int main () std::function<int (int )> func = foo; int important = 10 ; std::function<int (int )> func2 = [&](int value) -> int { return 1 +value+important; }; std::cout << func (10 ) << std::endl; std::cout << func2 (10 ) << std::endl; }
std::bind 和 std::placeholder
而 std::bind 则是用来绑定函数调用的参数的,它解决的需求是我们有时候可能并不一定能够一次性获得调用某个函数的全部参数,通过这个函数,我们可以将部分调用参数提前绑定到函数身上成为一个新的对象,然后在参数齐全后,完成调用。例如:
1
2
3
4
5
6
7
8
9
10
int foo (int a, int b, int c) ; } int main () auto bindFoo = std::bind (foo, std::placeholders::_1, 1 ,2 ); bindFoo (1 ); }
提示:注意 auto 关键字的妙用。有时候我们可能不太熟悉一个函数的返回值类型,但是我们却可以通过 auto 的使用来规避这一问题的出现。
Files
运行开始菜单的 “MSYS2 MinGW Clang x64”,运行下面命令进入项目目录。
1 cd /f/vscode/cpp_projects/modern-cpp-tutorial/code/3/
创建 3.2.function.wrap.cpp 文件,粘贴下面代码。
1 2 3 4 5 6 7 8 9 10 11 12 13 14 15 16 17 18 19 20 21 22 23 24 25 26 27 28 29 30 31 32 33 34 35 36 37 38 39 40 41 42 43 44 45 #include <functional> #include <iostream> using foo = void (int ); void functional (foo f) f (1 ); } int foo2 (int para) return para; } int foo3 (int a, int b, int c) return 0 ; } int main () auto f = [](int value) { std::cout << value << std::endl; }; functional (f); f (1 ); std::function<int (int )> func = foo2; int important = 10 ; std::function<int (int )> func2 = [&](int value) -> int { return 1 +value+important; }; std::cout << func (10 ) << std::endl; std::cout << func2 (10 ) << std::endl; auto bindFoo = std::bind (foo3, std::placeholders::_1, 1 , 2 ); bindFoo (1 ); return 0 ; }
1
2
3
4
5
6
7
8
lyf@DESKTOP-GV2QHKN CLANG64 /f/vscode/cpp_projects/modern-cpp-tutorial/code/3 $ tree . ├── 3.1.lambda.basic.cpp ├── 3.2.function.wrap.cpp └── Makefile 0 directories, 3 files
1
2
3
4
5
6
7
8
9
10
11
12
13
14
15
16
17
18
19
20
21
22
23
24
25
26
27
28
29
30
31
lyf@DESKTOP-GV2QHKN CLANG64 /f/vscode/cpp_projects/modern-cpp-tutorial/code/3 $ ls 3.1.lambda.basic.cpp 3.2.function.wrap.cpp Makefile lyf@DESKTOP-GV2QHKN CLANG64 /f/vscode/cpp_projects/modern-cpp-tutorial/code/3 $ make clang++ 3.1.lambda.basic.cpp -o 3.1.lambda.basic.out -std=c++2a -pedantic clang++ 3.2.function.wrap.cpp -o 3.2.function.wrap.out -std=c++2a -pedantic lyf@DESKTOP-GV2QHKN CLANG64 /f/vscode/cpp_projects/modern-cpp-tutorial/code/3 $ ls 3.1.lambda.basic.cpp 3.2.function.wrap.cpp Makefile 3.1.lambda.basic.out 3.2.function.wrap.out lyf@DESKTOP-GV2QHKN CLANG64 /f/vscode/cpp_projects/modern-cpp-tutorial/code/3 $ ./3.2.function.wrap.out 1 1 10 21 lyf@DESKTOP-GV2QHKN CLANG64 /f/vscode/cpp_projects/modern-cpp-tutorial/code/3 $ make clean rm *.out lyf@DESKTOP-GV2QHKN CLANG64 /f/vscode/cpp_projects/modern-cpp-tutorial/code/3 $ ls 3.1.lambda.basic.cpp 3.2.function.wrap.cpp Makefile lyf@DESKTOP-GV2QHKN CLANG64 /f/vscode/cpp_projects/modern-cpp-tutorial/code/3 $
右值引用
右值引用是 C++11 引入的与 Lambda 表达式齐名的重要特性之一。它的引入解决了 C++ 中大量的历史遗留问题,消除了诸如 std::vector、std::string 之类的额外开销,也才使得函数对象容器 std::function 成为了可能。
左值、右值的纯右值、将亡值、右值
要弄明白右值引用到底是怎么一回事,必须要对左值和右值做一个明确的理解。
左值 (lvalue, left value),顾名思义就是赋值符号左边的值。准确来说,左值是表达式(不一定是赋值表达式)后依然存在的持久对象。
右值 (rvalue, right value),右边的值,是指表达式结束后就不再存在的临时对象。
而 C++11 中为了引入强大的右值引用,将右值的概念进行了进一步的划分,分为:纯右值、将亡值。
纯右值 (prvalue, pure rvalue),纯粹的右值,要么是纯粹的字面量,例如 10, true;要么是求值结果相当于字面量或匿名临时对象,例如 1+2。非引用返回的临时变量、运算表达式产生的临时变量、原始字面量、Lambda 表达式都属于纯右值。
需要注意的是,字面量除了字符串字面量以外,均为纯右值。而字符串字面量是一个左值,类型为 const char 数组。例如:
1 2 3 4 5 6 7 8 9 10 11 12 13 #include <type_traits> int main () const char (&left) [6] "01234" ; static_assert (std::is_same<decltype ("01234" ), const char (&)[6 ]>::value, "" ); }
但是注意,数组可以被隐式转换成相对应的指针类型,而转换表达式的结果(如果不是左值引用)则一定是个右值(右值引用为将亡值,否则为纯右值)。例如:
1
2
3
const char * p = "01234" ; const char *&& pr = "01234" ;
将亡值(xvalue, expiring value) ,是 C++11 为了引入右值引用而提出的概念(因此在传统 C++ 中,纯右值和右值是同一个概念),也就是即将被销毁、却能够被移动的值。
将亡值可能稍有些难以理解,我们来看这样的代码:
1 2 3 4 5 6 std::vector<int > foo () { std::vector<int > temp = {1 , 2 , 3 , 4 }; return temp; } std::vector<int > v = foo ();
在这样的代码中,就传统的理解而言,函数 foo 的返回值 temp 在内部创建然后被赋值给 v,然而 v 获得这个对象时,会将整个 temp 拷贝一份,然后把 temp 销毁,如果这个 temp 非常大,这将造成大量额外的开销(这也就是传统 C++ 一直被诟病的问题)。在最后一行中,v 是左值、foo() 返回的值就是右值(也是纯右值)。但是,v 可以被别的变量捕获到,而 foo() 产生的那个返回值作为一个临时值,一旦被 v 复制后,将立即被销毁,无法获取、也不能修改。而将亡值就定义了这样一种行为:临时的值能够被识别、同时又能够被移动。
在 C++11 之后,编译器为我们做了一些工作,此处的左值 temp 会被进行此隐式右值转换,等价于 static_cast<std::vector<int> &&>(temp),进而此处的 v 会将 foo 局部返回的值进行移动。也就是后面我们将会提到的移动语义。
右值引用和左值引用
要拿到一个将亡值,就需要用到右值引用:T &&,其中 T 是类型。右值引用的声明让这个临时值的生命周期得以延长、只要变量还活着,那么将亡值将继续存活。
C++11 提供了 std::move 这个方法将左值参数无条件的转换为右值,有了它我们就能够方便的获得一个右值临时对象,例如:
1 2 3 4 5 6 7 8 9 10 11 12 13 14 15 16 17 18 19 20 21 22 23 24 25 26 27 28 29 #include <iostream> #include <string> void reference (std::string& str) std::cout << "左值" << std::endl; } void reference (std::string&& str) std::cout << "右值" << std::endl; } int main () std::string lv1 = "string," ; std::string&& rv1 = std::move (lv1); std::cout << rv1 << std::endl; const std::string& lv2 = lv1 + lv1; std::cout << lv2 << std::endl; std::string&& rv2 = lv1 + lv2; rv2 += "Test" ; std::cout << rv2 << std::endl; reference (rv2); return 0 ; }
rv2 虽然引用了一个右值,但由于它是一个引用,所以 rv2 依然是一个左值。
注意,这里有一个很有趣的历史遗留问题,我们先看下面的代码:
1 2 3 4 5 6 7 8 #include <iostream> int main () const int &b = std::move (1 ); std::cout << a << b << std::endl; }
第一个问题,为什么不允许非常量引用绑定到非左值?这是因为这种做法存在逻辑错误:
1
2
3
4
5
6
7
void increase (int & v) v++; } void foo () double s = 1 ; increase (s); }
由于 int& 不能引用 double 类型的参数,因此必须产生一个临时值来保存 s 的值,从而当 increase() 修改这个临时值时,调用完成后 s 本身并没有被修改。
第二个问题,为什么常量引用允许绑定到非左值?原因很简单,因为 Fortran 需要。
Files
运行开始菜单的 “MSYS2 MinGW Clang x64”,运行下面命令进入项目目录。
1 cd /f/vscode/cpp_projects/modern-cpp-tutorial/code/3/
创建 3.3.rvalue.cpp 文件,粘贴下面代码。
1 2 3 4 5 6 7 8 9 10 11 12 13 14 15 16 17 18 19 20 21 22 23 24 25 26 27 28 29 30 31 32 #include <iostream> #include <string> void reference (std::string& str) std::cout << "lvalue" << std::endl; } void reference (std::string&& str) std::cout << "rvalue" << std::endl; } int main () std::string lv1 = "string," ; std::string&& rv1 = std::move (lv1); std::cout << rv1 << std::endl; const std::string& lv2 = lv1 + lv1; std::cout << lv2 << std::endl; std::string&& rv2= lv1 + lv2; rv2 += "string" ; std::cout << rv2 << std::endl; reference (rv2); return 0 ; }
创建 3.4.historical.cpp 文件,粘贴下面代码。
1 2 3 4 5 6 7 8 9 10 11 #include <iostream> int main () const int &b = std::move (1 ); std::cout << b << std::endl; }
1
2
3
4
5
6
7
8
9
10
lyf@DESKTOP-GV2QHKN CLANG64 /f/vscode/cpp_projects/modern-cpp-tutorial/code/3 $ tree . ├── 3.1.lambda.basic.cpp ├── 3.2.function.wrap.cpp ├── 3.3.rvalue.cpp ├── 3.4.historical.cpp └── Makefile 0 directories, 5 files
1
2
3
4
5
6
7
8
9
10
11
12
13
14
15
16
17
18
19
20
21
22
23
24
25
26
27
28
29
30
31
32
33
34
35
36
37
38
39
40
41
42
lyf@DESKTOP-GV2QHKN CLANG64 /f/vscode/cpp_projects/modern-cpp-tutorial/code/3 $ ls 3.1.lambda.basic.cpp 3.3.rvalue.cpp Makefile 3.2.function.wrap.cpp 3.4.historical.cpp lyf@DESKTOP-GV2QHKN CLANG64 /f/vscode/cpp_projects/modern-cpp-tutorial/code/3 $ make clang++ 3.1.lambda.basic.cpp -o 3.1.lambda.basic.out -std=c++2a -pedantic clang++ 3.2.function.wrap.cpp -o 3.2.function.wrap.out -std=c++2a -pedantic clang++ 3.3.rvalue.cpp -o 3.3.rvalue.out -std=c++2a -pedantic clang++ 3.4.historical.cpp -o 3.4.historical.out -std=c++2a -pedantic lyf@DESKTOP-GV2QHKN CLANG64 /f/vscode/cpp_projects/modern-cpp-tutorial/code/3 $ ls 3.1.lambda.basic.cpp 3.3.rvalue.out 3.1.lambda.basic.out 3.4.historical.cpp 3.2.function.wrap.cpp 3.4.historical.out 3.2.function.wrap.out Makefile 3.3.rvalue.cpp lyf@DESKTOP-GV2QHKN CLANG64 /f/vscode/cpp_projects/modern-cpp-tutorial/code/3 $ ./3.3.rvalue.out string, string,string, string,string,string,string lvalue lyf@DESKTOP-GV2QHKN CLANG64 /f/vscode/cpp_projects/modern-cpp-tutorial/code/3 $ ./3.4.historical.out 1 lyf@DESKTOP-GV2QHKN CLANG64 /f/vscode/cpp_projects/modern-cpp-tutorial/code/3 $ make clean rm *.out lyf@DESKTOP-GV2QHKN CLANG64 /f/vscode/cpp_projects/modern-cpp-tutorial/code/3 $ ls 3.1.lambda.basic.cpp 3.3.rvalue.cpp Makefile 3.2.function.wrap.cpp 3.4.historical.cpp lyf@DESKTOP-GV2QHKN CLANG64 /f/vscode/cpp_projects/modern-cpp-tutorial/code/3 $
移动语义
传统 C++ 通过拷贝构造函数和赋值操作符为类对象设计了拷贝/复制的概念,但为了实现对资源的移动操作,调用者必须使用先复制、再析构的方式,否则就需要自己实现移动对象的接口。试想,搬家的时候是把家里的东西直接搬到新家去,而不是将所有东西复制一份(重买)再放到新家、再把原来的东西全部扔掉(销毁),这是非常反人类的一件事情。
传统的 C++ 没有区分 移动和 拷贝 的概念,造成了大量的数据拷贝,浪费时间和空间。右值引用的出现恰好就解决了这两个概念的混淆问题,例如:
1 2 3 4 5 6 7 8 9 10 11 12 13 14 15 16 17 18 19 20 21 22 23 24 25 26 27 28 29 30 31 32 #include <iostream> class A {public : int *pointer; A ():pointer (new int (1 )) { std::cout << "构造" << pointer << std::endl; } A (A& a):pointer (new int (*a.pointer)) { std::cout << "拷贝" << pointer << std::endl; } A (A&& a):pointer (a.pointer) { a.pointer = nullptr ; std::cout << "移动" << pointer << std::endl; } ~A (){ std::cout << "析构" << pointer << std::endl; delete pointer; } }; A return_rvalue (bool test) { A a,b; if (test) return a; else return b; } int main () A obj = return_rvalue (false ); std::cout << "obj:" << std::endl; std::cout << obj.pointer << std::endl; std::cout << *obj.pointer << std::endl; return 0 ; }
在上面的代码中:
首先会在 return_rvalue 内部构造两个 A 对象,于是获得两个构造函数的输出;
函数返回后,产生一个将亡值,被 A 的移动构造(A(A&&))引用,从而延长生命周期,并将这个右值中的指针拿到,保存到了 obj 中,而将亡值的指针被设置为 nullptr,防止了这块内存区域被销毁。
从而避免了无意义的拷贝构造,加强了性能。再来看看涉及标准库的例子:
1 2 3 4 5 6 7 8 9 10 11 12 13 14 15 16 17 18 19 20 21 22 23 24 #include <iostream> #include <utility> #include <vector> #include <string> int main () std::string str = "Hello world." ; std::vector<std::string> v; v.push_back (str); std::cout << "str: " << str << std::endl; v.push_back (std::move (str)); std::cout << "str: " << str << std::endl; return 0 ; }
Files
运行开始菜单的 “MSYS2 MinGW Clang x64”,运行下面命令进入项目目录。
1 cd /f/vscode/cpp_projects/modern-cpp-tutorial/code/3/
创建 3.5.move.semantics.cpp 文件,粘贴下面代码。
1 2 3 4 5 6 7 8 9 10 11 12 13 14 15 16 17 18 19 20 21 22 23 24 25 26 27 28 29 30 31 32 33 34 35 36 37 38 39 40 41 #include <iostream> class A {public : int *pointer; A ():pointer (new int (1 )) { std::cout << "construct" << pointer << std::endl; } A (A& a):pointer (new int (*a.pointer)) { std::cout << "copy" << pointer << std::endl; } A (A&& a):pointer (a.pointer) { a.pointer = nullptr ; std::cout << "move" << pointer << std::endl; } ~A (){ std::cout << "destruct" << pointer << std::endl; delete pointer; } }; A return_rvalue (bool test) { A a,b; if (test) return a; else return b; } int main () A obj = return_rvalue (false ); std::cout << "obj:" << std::endl; std::cout << obj.pointer << std::endl; std::cout << *obj.pointer << std::endl; return 0 ; }
创建 3.6.move.semantics.cpp 文件,粘贴下面代码。
1 2 3 4 5 6 7 8 9 10 11 12 13 14 15 16 17 18 19 20 21 22 23 24 25 26 #include <iostream> #include <utility> #include <vector> #include <string> int main () std::string str = "Hello world." ; std::vector<std::string> v; v.push_back (str); std::cout << "str: " << str << std::endl; v.push_back (std::move (str)); std::cout << "str: " << str << std::endl; return 0 ; }
1
2
3
4
5
6
7
8
9
10
11
12
lyf@DESKTOP-GV2QHKN CLANG64 /f/vscode/cpp_projects/modern-cpp-tutorial/code/3 $ tree . ├── 3.1.lambda.basic.cpp ├── 3.2.function.wrap.cpp ├── 3.3.rvalue.cpp ├── 3.4.historical.cpp ├── 3.5.move.semantics.cpp ├── 3.6.move.semantics.cpp └── Makefile 0 directories, 7 files
1
2
3
4
5
6
7
8
9
10
11
12
13
14
15
16
17
18
19
20
21
22
23
24
25
26
27
28
29
30
31
32
33
34
35
36
37
38
39
40
41
42
43
44
45
46
47
48
49
50
51
52
53
54
lyf@DESKTOP-GV2QHKN CLANG64 /f/vscode/cpp_projects/modern-cpp-tutorial/code/3 $ ls 3.1.lambda.basic.cpp 3.4.historical.cpp Makefile 3.2.function.wrap.cpp 3.5.move.semantics.cpp 3.3.rvalue.cpp 3.6.move.semantics.cpp lyf@DESKTOP-GV2QHKN CLANG64 /f/vscode/cpp_projects/modern-cpp-tutorial/code/3 $ make clang++ 3.1.lambda.basic.cpp -o 3.1.lambda.basic.out -std=c++2a -pedantic clang++ 3.2.function.wrap.cpp -o 3.2.function.wrap.out -std=c++2a -pedantic clang++ 3.3.rvalue.cpp -o 3.3.rvalue.out -std=c++2a -pedantic clang++ 3.4.historical.cpp -o 3.4.historical.out -std=c++2a -pedantic clang++ 3.5.move.semantics.cpp -o 3.5.move.semantics.out -std=c++2a -pedantic clang++ 3.6.move.semantics.cpp -o 3.6.move.semantics.out -std=c++2a -pedantic lyf@DESKTOP-GV2QHKN CLANG64 /f/vscode/cpp_projects/modern-cpp-tutorial/code/3 $ ls 3.1.lambda.basic.cpp 3.4.historical.out 3.1.lambda.basic.out 3.5.move.semantics.cpp 3.2.function.wrap.cpp 3.5.move.semantics.out 3.2.function.wrap.out 3.6.move.semantics.cpp 3.3.rvalue.cpp 3.6.move.semantics.out 3.3.rvalue.out Makefile 3.4.historical.cpp lyf@DESKTOP-GV2QHKN CLANG64 /f/vscode/cpp_projects/modern-cpp-tutorial/code/3 $ ./3.5.move.semantics.out construct000002B19FC567D0 construct000002B19FC56810 move000002B19FC56810 destruct0000000000000000 destruct000002B19FC567D0 obj: 000002B19FC56810 1 destruct000002B19FC56810 lyf@DESKTOP-GV2QHKN CLANG64 /f/vscode/cpp_projects/modern-cpp-tutorial/code/3 $ ./3.6.move.semantics.out str: Hello world. str: lyf@DESKTOP-GV2QHKN CLANG64 /f/vscode/cpp_projects/modern-cpp-tutorial/code/3 $ make clean rm *.out lyf@DESKTOP-GV2QHKN CLANG64 /f/vscode/cpp_projects/modern-cpp-tutorial/code/3 $ ls 3.1.lambda.basic.cpp 3.4.historical.cpp Makefile 3.2.function.wrap.cpp 3.5.move.semantics.cpp 3.3.rvalue.cpp 3.6.move.semantics.cpp lyf@DESKTOP-GV2QHKN CLANG64 /f/vscode/cpp_projects/modern-cpp-tutorial/code/3 $
完美转发
前面我们提到了,一个声明的右值引用其实是一个左值。这就为我们进行参数转发(传递)造成了问题:
1
2
3
4
5
6
7
8
9
10
11
12
13
14
15
16
17
18
19
20
21
void reference (int & v) std::cout << "左值" << std::endl; } void reference (int && v) std::cout << "右值" << std::endl; } template <typename T>void pass (T&& v) std::cout << "普通传参:" ; reference (v); } int main () std::cout << "传递右值:" << std::endl; pass (1 ); std::cout << "传递左值:" << std::endl; int l = 1 ; pass (l); return 0 ; }
对于 pass(1) 来说,虽然传递的是右值,但由于 v 是一个引用,所以同时也是左值。因此 reference(v) 会调用 reference(int&),输出左值。而对于 pass(l) 而言,l 是一个左值,为什么会成功传递给 pass(T&&) 呢?
这是基于引用坍缩规则的:在传统 C++ 中,我们不能够对一个引用类型继续进行引用,但 C++ 由于右值引用的出现而放宽了这一做法,从而产生了引用坍缩规则,允许我们对引用进行引用, 既能左引用,又能右引用。但是却遵循如下规则:
函数形参类型 实参参数类型 推导后函数形参类型
T&
左引用
T&
T&
右引用
T&
T&&
左引用
T&
T&&
右引用
T&&
因此,模板函数中使用 T&& 不一定能进行右值引用,当传入左值时,此函数的引用将被推导为左值。更准确的讲,无论模板参数是什么类型的引用,当且仅当实参类型为右引用时,模板参数才能被推导为右引用类型 。这才使得 v 作为左值的成功传递。
完美转发就是基于上述规律产生的。所谓完美转发,就是为了让我们在传递参数的时候,保持原来的参数类型(左引用保持左引用,右引用保持右引用)。为了解决这个问题,我们应该使用 std::forward 来进行参数的转发(传递):
1 2 3 4 5 6 7 8 9 10 11 12 13 14 15 16 17 18 19 20 21 22 23 24 25 26 27 28 29 #include <iostream> #include <utility> void reference (int & v) std::cout << "左值引用" << std::endl; } void reference (int && v) std::cout << "右值引用" << std::endl; } template <typename T>void pass (T&& v) std::cout << " 普通传参: " ; reference (v); std::cout << " std::move 传参: " ; reference (std::move (v)); std::cout << " std::forward 传参: " ; reference (std::forward<T>(v)); std::cout << "static_cast<T&&> 传参: " ; reference (static_cast <T&&>(v)); } int main () std::cout << "传递右值:" << std::endl; pass (1 ); std::cout << "传递左值:" << std::endl; int v = 1 ; pass (v); return 0 ; }
输出结果为:
1
2
3
4
5
6
7
8
9
10
传递右值: 普通传参: 左值引用 std::move 传参: 右值引用 std::forward 传参: 右值引用 static_cast<T&&> 传参: 右值引用 传递左值: 普通传参: 左值引用 std::move 传参: 右值引用 std::forward 传参: 左值引用 static_cast<T&&> 传参: 左值引用
无论传递参数为左值还是右值,普通传参都会将参数作为左值进行转发,所以 std::move 总会接受到一个左值,从而转发调用了reference(int&&) 输出右值引用。
唯独 std::forward 即没有造成任何多余的拷贝,同时完美转发(传递)了函数的实参给了内部调用的其他函数。
std::forward 和 std::move 一样,没有做任何事情,std::move 单纯的将左值转化为右值,std::forward 也只是单纯的将参数做了一个类型的转换,从现象上来看,std::forward<T>(v) 和 static_cast<T&&>(v) 是完全一样的。
读者可能会好奇,为何一条语句能够针对两种类型的返回对应的值,我们再简单看一看 std::forward 的具体实现机制,std::forward 包含两个重载:
1
2
3
4
5
6
7
8
9
10
11
template <typename _Tp>constexpr _Tp&& forward (typename std::remove_reference<_Tp>::type& __t ) noexcept return static_cast <_Tp&&>(__t ); }template <typename _Tp>constexpr _Tp&& forward (typename std::remove_reference<_Tp>::type&& __t ) noexcept static_assert (!std::is_lvalue_reference<_Tp>::value, "template argument" " substituting _Tp is an lvalue reference type" ); return static_cast <_Tp&&>(__t ); }
在这份实现中,std::remove_reference 的功能是消除类型中的引用,std::is_lvalue_reference 则用于检查类型推导是否正确,在 std::forward 的第二个实现中检查了接收到的值确实是一个左值,进而体现了坍缩规则。
当 std::forward 接受左值时,_Tp 被推导为左值,所以返回值为左值;而当其接受右值时,_Tp 被推导为右值引用,则基于坍缩规则,返回值便成为了 && + && 的右值。可见 std::forward 的原理在于巧妙的利用了模板类型推导中产生的差异。
这时我们能回答这样一个问题:为什么在使用循环语句的过程中,auto&& 是最安全的方式? 因为当 auto 被推导为不同的左右引用时,与 && 的坍缩组合是完美转发。
Files
运行开始菜单的 “MSYS2 MinGW Clang x64”,运行下面命令进入项目目录。
1 cd /f/vscode/cpp_projects/modern-cpp-tutorial/code/3/
创建 3.7.perfect.forward.cpp 文件,粘贴下面代码。
1 2 3 4 5 6 7 8 9 10 11 12 13 14 15 16 17 18 19 20 21 22 23 24 25 26 27 28 29 30 31 32 33 34 35 36 #include <iostream> #include <utility> void reference (int & v) std::cout << "lvalue reference" << std::endl; } void reference (int && v) std::cout << "rvalue reference" << std::endl; } template <typename T>void pass (T&& v) std::cout << " normal param passing: " ; reference (v); std::cout << " std::move param passing: " ; reference (std::move (v)); std::cout << " std::forward param passing: " ; reference (std::forward<T>(v)); std::cout << "static_cast<T&&> param passing: " ; reference (static_cast <T&&>(v)); } int main () std::cout << "rvalue pass:" << std::endl; pass (1 ); std::cout << "lvalue pass:" << std::endl; int l = 1 ; pass (l); return 0 ; }
1
2
3
4
5
6
7
8
9
10
11
12
13
lyf@DESKTOP-GV2QHKN CLANG64 /f/vscode/cpp_projects/modern-cpp-tutorial/code/3 $ tree . ├── 3.1.lambda.basic.cpp ├── 3.2.function.wrap.cpp ├── 3.3.rvalue.cpp ├── 3.4.historical.cpp ├── 3.5.move.semantics.cpp ├── 3.6.move.semantics.cpp ├── 3.7.perfect.forward.cpp └── Makefile 0 directories, 8 files
1
2
3
4
5
6
7
8
9
10
11
12
13
14
15
16
17
18
19
20
21
22
23
24
25
26
27
28
29
30
31
32
33
34
35
36
37
38
39
40
41
42
43
44
45
46
47
48
49
50
51
52
53
54
lyf@DESKTOP-GV2QHKN CLANG64 /f/vscode/cpp_projects/modern-cpp-tutorial/code/3 $ ls 3.1.lambda.basic.cpp 3.5.move.semantics.cpp 3.2.function.wrap.cpp 3.6.move.semantics.cpp 3.3.rvalue.cpp 3.7.perfect.forward.cpp 3.4.historical.cpp Makefile lyf@DESKTOP-GV2QHKN CLANG64 /f/vscode/cpp_projects/modern-cpp-tutorial/code/3 $ make clang++ 3.1.lambda.basic.cpp -o 3.1.lambda.basic.out -std=c++2a -pedantic clang++ 3.2.function.wrap.cpp -o 3.2.function.wrap.out -std=c++2a -pedantic clang++ 3.3.rvalue.cpp -o 3.3.rvalue.out -std=c++2a -pedantic clang++ 3.4.historical.cpp -o 3.4.historical.out -std=c++2a -pedantic clang++ 3.5.move.semantics.cpp -o 3.5.move.semantics.out -std=c++2a -pedantic clang++ 3.6.move.semantics.cpp -o 3.6.move.semantics.out -std=c++2a -pedantic clang++ 3.7.perfect.forward.cpp -o 3.7.perfect.forward.out -std=c++2a -pedantic lyf@DESKTOP-GV2QHKN CLANG64 /f/vscode/cpp_projects/modern-cpp-tutorial/code/3 $ ls 3.1.lambda.basic.cpp 3.5.move.semantics.cpp 3.1.lambda.basic.out 3.5.move.semantics.out 3.2.function.wrap.cpp 3.6.move.semantics.cpp 3.2.function.wrap.out 3.6.move.semantics.out 3.3.rvalue.cpp 3.7.perfect.forward.cpp 3.3.rvalue.out 3.7.perfect.forward.out 3.4.historical.cpp Makefile 3.4.historical.out lyf@DESKTOP-GV2QHKN CLANG64 /f/vscode/cpp_projects/modern-cpp-tutorial/code/3 $ ./3.7.perfect.forward.out rvalue pass: normal param passing: lvalue reference std::move param passing: rvalue reference std::forward param passing: rvalue reference static_cast<T&&> param passing: rvalue reference lvalue pass: normal param passing: lvalue reference std::move param passing: rvalue reference std::forward param passing: lvalue reference static_cast<T&&> param passing: lvalue reference lyf@DESKTOP-GV2QHKN CLANG64 /f/vscode/cpp_projects/modern-cpp-tutorial/code/3 $ make clean rm *.out lyf@DESKTOP-GV2QHKN CLANG64 /f/vscode/cpp_projects/modern-cpp-tutorial/code/3 $ ls 3.1.lambda.basic.cpp 3.5.move.semantics.cpp 3.2.function.wrap.cpp 3.6.move.semantics.cpp 3.3.rvalue.cpp 3.7.perfect.forward.cpp 3.4.historical.cpp Makefile lyf@DESKTOP-GV2QHKN CLANG64 /f/vscode/cpp_projects/modern-cpp-tutorial/code/3 $
总结
本章介绍了现代 C++ 中最为重要的几个语言运行时的增强,其中笔者认为本节中提到的所有特性都是值得掌握的:
Lambda 表达式。
函数对象容器 std::function。
右值引用。
进一步阅读的参考文献
Bjarne Stroustrup, C++ 语言的设计与演化
第 4 章 容器
线性容器
std::array
看到这个容器的时候肯定会出现这样的问题:
为什么要引入 std::array 而不是直接使用 std::vector?
已经有了传统数组,为什么要用 std::array?
先回答第一个问题,与 std::vector 不同,std::array 对象的大小是固定的,如果容器大小是固定的,那么可以优先考虑使用 std::array 容器。另外由于 std::vector 是自动扩容的,当存入大量的数据后,并且对容器进行了删除操作,容器并不会自动归还被删除元素相应的内存,这时候就需要手动运行 shrink_to_fit() 释放这部分内存。
1 2 3 4 5 6 7 8 9 10 11 12 13 14 15 16 17 18 19 20 21 22 23 24 25 26 27 std::vector<int > v; std::cout << "size:" << v.size () << std::endl; std::cout << "capacity:" << v.capacity () << std::endl; v.push_back (1 ); v.push_back (2 ); v.push_back (3 ); std::cout << "size:" << v.size () << std::endl; std::cout << "capacity:" << v.capacity () << std::endl; v.push_back (4 ); v.push_back (5 ); std::cout << "size:" << v.size () << std::endl; std::cout << "capacity:" << v.capacity () << std::endl; v.clear (); std::cout << "size:" << v.size () << std::endl; std::cout << "capacity:" << v.capacity () << std::endl; v.shrink_to_fit (); std::cout << "size:" << v.size () << std::endl; std::cout << "capacity:" << v.capacity () << std::endl;
而第二个问题就更加简单,使用 std::array 能够让代码变得更加“现代化”,而且封装了一些操作函数,比如获取数组大小以及检查是否非空,同时还能够友好的使用标准库中的容器算法,比如 std::sort。
使用 std::array 很简单,只需指定其类型和大小即可:
1 2 3 4 5 6 7 8 9 10 11 12 13 14 15 16 17 18 19 20 21 22 std::array<int , 4> arr = {1 , 2 , 3 , 4 }; arr.empty (); arr.size (); for (auto &i : arr){ } std::sort (arr.begin (), arr.end (), [](int a, int b) { return b < a; }); constexpr int len = 4 ;std::array<int , len> arr = {1 , 2 , 3 , 4 };
当我们开始用上了 std::array 时,难免会遇到要将其兼容 C 风格的接口,这里有三种做法:
1
2
3
4
5
6
7
8
9
10
11
12
13
void foo (int *p, int len) return ; } std::array<int , 4> arr = {1 ,2 ,3 ,4 }; foo (&arr[0 ], arr.size ());foo (arr.data (), arr.size ());std::sort (arr.begin (), arr.end ());
std::forward_list
std::forward_list 是一个列表容器,使用方法和 std::list 基本类似,因此我们就不花费篇幅进行介绍了。
需要知道的是,和 std::list 的双向链表的实现不同,std::forward_list 使用单向链表进行实现,提供了 O(1) 复杂度的元素插入,不支持快速随机访问(这也是链表的特点),也是标准库容器中唯一一个不提供 size() 方法的容器。当不需要双向迭代时,具有比 std::list 更高的空间利用率。
Files
运行开始菜单的 “MSYS2 MinGW Clang x64”,运行下面命令构建项目目录。
1
2
3
cd /f/vscode/cpp_projects/modern-cpp-tutorial/code/ mkdir 4 cd 4/
创建 4.1.linear.container.cpp 文件,粘贴下面代码。
1 2 3 4 5 6 7 8 9 10 11 12 13 14 15 16 17 18 19 20 21 22 23 24 25 26 27 28 29 30 31 32 33 34 35 36 37 38 39 40 41 42 43 44 45 46 47 48 49 50 51 52 53 54 55 56 57 58 59 60 61 62 #include <iostream> #include <array> #include <vector> void foo (int *p, int len) for (int i = 0 ; i != len; ++i) { std::cout << p[i] << std::endl; } } int main () std::vector<int > v; std::cout << "size:" << v.size () << std::endl; std::cout << "capacity:" << v.capacity () << std::endl; v.push_back (1 ); v.push_back (2 ); v.push_back (3 ); std::cout << "size:" << v.size () << std::endl; std::cout << "capacity:" << v.capacity () << std::endl; v.push_back (4 ); v.push_back (5 ); std::cout << "size:" << v.size () << std::endl; std::cout << "capacity:" << v.capacity () << std::endl; v.clear (); std::cout << "size:" << v.size () << std::endl; std::cout << "capacity:" << v.capacity () << std::endl; v.shrink_to_fit (); std::cout << "size:" << v.size () << std::endl; std::cout << "capacity:" << v.capacity () << std::endl; std::array<int , 4> arr = {1 , 4 , 3 , 2 }; foo (&arr[0 ], arr.size ()); foo (arr.data (), arr.size ()); std::sort (arr.begin (), arr.end ()); for (auto &i : arr) std::cout << i << std::endl; return 0 ; }
创建 Makefile 文件,粘贴下面代码。
1 2 3 4 5 6 7 8 9 10 all: $(patsubst %.cpp, %.out, $(wildcard *.cpp)) %.out: %.cpp Makefile clang++ $< -o $@ -std=c++2a -pedantic clean: rm *.out
1
2
3
4
5
6
7
lyf@DESKTOP-GV2QHKN CLANG64 /f/vscode/cpp_projects/modern-cpp-tutorial/code/4 $ tree . ├── 4.1.linear.container.cpp └── Makefile 0 directories, 2 files
1
2
3
4
5
6
7
8
9
10
11
12
13
14
15
16
17
18
19
20
21
22
23
24
25
26
27
28
29
30
31
32
33
34
35
36
37
38
39
40
41
42
43
44
45
46
47
lyf@DESKTOP-GV2QHKN CLANG64 /f/vscode/cpp_projects/modern-cpp-tutorial/code/4 $ ls 4.1.linear.container.cpp Makefile lyf@DESKTOP-GV2QHKN CLANG64 /f/vscode/cpp_projects/modern-cpp-tutorial/code/4 $ make clang++ 4.1.linear.container.cpp -o 4.1.linear.container.out -std=c++2a -pedantic lyf@DESKTOP-GV2QHKN CLANG64 /f/vscode/cpp_projects/modern-cpp-tutorial/code/4 $ ls 4.1.linear.container.cpp 4.1.linear.container.out Makefile lyf@DESKTOP-GV2QHKN CLANG64 /f/vscode/cpp_projects/modern-cpp-tutorial/code/4 $ ./4.1.linear.container.out size:0 capacity:0 size:3 capacity:4 size:5 capacity:8 size:0 capacity:8 size:0 capacity:0 1 4 3 2 1 4 3 2 1 2 3 4 lyf@DESKTOP-GV2QHKN CLANG64 /f/vscode/cpp_projects/modern-cpp-tutorial/code/4 $ make clean rm *.out lyf@DESKTOP-GV2QHKN CLANG64 /f/vscode/cpp_projects/modern-cpp-tutorial/code/4 $ ls 4.1.linear.container.cpp Makefile lyf@DESKTOP-GV2QHKN CLANG64 /f/vscode/cpp_projects/modern-cpp-tutorial/code/4 $
无序容器
我们已经熟知了传统 C++ 中的有序容器 std::map/std::set,这些元素内部通过红黑树进行实现,插入和搜索的平均复杂度均为 O(log(size))。在插入元素时候,会根据 < 操作符比较元素大小并判断元素是否相同,并选择合适的位置插入到容器中。当对这个容器中的元素进行遍历时,输出结果会按照 < 操作符的顺序来逐个遍历。
而无序容器中的元素是不进行排序的,内部通过 Hash 表实现,插入和搜索元素的平均复杂度为 O(constant),在不关心容器内部元素顺序时,能够获得显著的性能提升。
C++11 引入了的两组无序容器分别是:std::unordered_map/std::unordered_multimap 和 std::unordered_set/std::unordered_multiset。
它们的用法和原有的 std::map/std::multimap/std::set/set::multiset 基本类似,由于这些容器我们已经很熟悉了,便不一一举例,我们直接来比较一下 std::map 和 std::unordered_map:
1 2 3 4 5 6 7 8 9 10 11 12 13 14 15 16 17 18 19 20 21 22 23 24 25 26 27 28 #include <iostream> #include <string> #include <unordered_map> #include <map> int main () std::unordered_map<int , std::string> u = { {1 , "1" }, {3 , "3" }, {2 , "2" } }; std::map<int , std::string> v = { {1 , "1" }, {3 , "3" }, {2 , "2" } }; std::cout << "std::unordered_map" << std::endl; for ( const auto & n : u) std::cout << "Key:[" << n.first << "] Value:[" << n.second << "]\n" ; std::cout << std::endl; std::cout << "std::map" << std::endl; for ( const auto & n : v) std::cout << "Key:[" << n.first << "] Value:[" << n.second << "]\n" ; }
最终的输出结果为:
1
2
3
4
5
6
7
8
9
std::unordered_map Key:[2] Value:[2] Key:[3] Value:[3] Key:[1] Value:[1] std::map Key:[1] Value:[1] Key:[2] Value:[2] Key:[3] Value:[3]
Files
运行开始菜单的 “MSYS2 MinGW Clang x64”,运行下面命令进入项目目录。
1 cd /f/vscode/cpp_projects/modern-cpp-tutorial/code/4/
创建 4.2.unordered.map.cpp 文件,粘贴下面代码。
1 2 3 4 5 6 7 8 9 10 11 12 13 14 15 16 17 18 19 20 21 22 23 24 25 26 27 28 29 30 31 32 #include <iostream> #include <string> #include <unordered_map> #include <map> int main () std::unordered_map<int , std::string> u = { {1 , "1" }, {3 , "3" }, {2 , "2" } }; std::map<int , std::string> v = { {1 , "1" }, {3 , "3" }, {2 , "2" } }; std::cout << "std::unordered_map" << std::endl; for ( const auto & n : u) std::cout << "Key:[" << n.first << "] Value:[" << n.second << "]\n" ; std::cout << std::endl; std::cout << "std::map" << std::endl; for ( const auto & n : v) std::cout << "Key:[" << n.first << "] Value:[" << n.second << "]\n" ; }
1
2
3
4
5
6
7
8
lyf@DESKTOP-GV2QHKN CLANG64 /f/vscode/cpp_projects/modern-cpp-tutorial/code/4 $ tree . ├── 4.1.linear.container.cpp ├── 4.2.unordered.map.cpp └── Makefile 0 directories, 3 files
1
2
3
4
5
6
7
8
9
10
11
12
13
14
15
16
17
18
19
20
21
22
23
24
25
26
27
28
29
30
31
32
33
34
35
36
lyf@DESKTOP-GV2QHKN CLANG64 /f/vscode/cpp_projects/modern-cpp-tutorial/code/4 $ ls 4.1.linear.container.cpp 4.2.unordered.map.cpp Makefile lyf@DESKTOP-GV2QHKN CLANG64 /f/vscode/cpp_projects/modern-cpp-tutorial/code/4 $ make clang++ 4.1.linear.container.cpp -o 4.1.linear.container.out -std=c++2a -pedantic clang++ 4.2.unordered.map.cpp -o 4.2.unordered.map.out -std=c++2a -pedantic lyf@DESKTOP-GV2QHKN CLANG64 /f/vscode/cpp_projects/modern-cpp-tutorial/code/4 $ ls 4.1.linear.container.cpp 4.2.unordered.map.cpp Makefile 4.1.linear.container.out 4.2.unordered.map.out lyf@DESKTOP-GV2QHKN CLANG64 /f/vscode/cpp_projects/modern-cpp-tutorial/code/4 $ ./4.2.unordered.map.out std::unordered_map Key:[2] Value:[2] Key:[3] Value:[3] Key:[1] Value:[1] std::map Key:[1] Value:[1] Key:[2] Value:[2] Key:[3] Value:[3] lyf@DESKTOP-GV2QHKN CLANG64 /f/vscode/cpp_projects/modern-cpp-tutorial/code/4 $ make clean rm *.out lyf@DESKTOP-GV2QHKN CLANG64 /f/vscode/cpp_projects/modern-cpp-tutorial/code/4 $ ls 4.1.linear.container.cpp 4.2.unordered.map.cpp Makefile lyf@DESKTOP-GV2QHKN CLANG64 /f/vscode/cpp_projects/modern-cpp-tutorial/code/4 $
元组
了解过 Python 的程序员应该知道元组的概念,纵观传统 C++ 中的容器,除了 std::pair 外,似乎没有现成的结构能够用来存放不同类型的数据(通常我们会自己定义结构)。但 std::pair 的缺陷是显而易见的,只能保存两个元素。
元组基本操作
关于元组的使用有三个核心的函数:
std::make_tuple: 构造元组。
std::get: 获得元组某个位置的值。
std::tie: 元组拆包。
1 2 3 4 5 6 7 8 9 10 11 12 13 14 15 16 17 18 19 20 21 22 23 24 25 26 27 28 29 30 31 32 33 34 35 36 #include <tuple> #include <iostream> auto get_student (int id) if (id == 0 ) return std::make_tuple (3.8 , 'A' , "张三" ); if (id == 1 ) return std::make_tuple (2.9 , 'C' , "李四" ); if (id == 2 ) return std::make_tuple (1.7 , 'D' , "王五" ); return std::make_tuple (0.0 , 'D' , "null" ); } int main () auto student = get_student (0 ); std::cout << "ID: 0, " << "GPA: " << std::get <0 >(student) << ", " << "成绩: " << std::get <1 >(student) << ", " << "姓名: " << std::get <2 >(student) << '\n' ; double gpa; char grade; std::string name; std::tie (gpa, grade, name) = get_student (1 ); std::cout << "ID: 1, " << "GPA: " << gpa << ", " << "成绩: " << grade << ", " << "姓名: " << name << '\n' ; }
std::get 除了使用常量获取元组对象外,C++14 增加了使用类型来获取元组中的对象:
1
2
3
4
std::tuple<std::string, double , double , int > t ("123" , 4.5 , 6.7 , 8 ) ;std::cout << std::get <std::string>(t) << std::endl; std::cout << std::get <double >(t) << std::endl; std::cout << std::get <3 >(t) << std::endl;
运行期索引
如果你仔细思考一下可能就会发现上面代码的问题,std::get<> 依赖一个编译期的常量,所以下面的方式是不合法的:
1
2
int index = 1 ;std::get <index>(t);
那么要怎么处理?答案是,使用 std::variant<>(C++ 17 引入),提供给 variant<> 的类型模板参数可以让一个 variant<> 从而容纳提供的几种类型的变量(在其他语言,例如 Python/JavaScript 等,表现为动态类型):
1 2 3 4 5 6 7 8 9 10 11 12 13 14 15 16 17 18 #include <variant> template <size_t n, typename ... T>constexpr std::variant<T...> _tuple_index(const std::tuple<T...>& tpl, size_t i) { if constexpr (n >= sizeof ...(T)) throw std::out_of_range ("越界." ) ; if (i == n) return std::variant<T...>{ std::in_place_index<n>, std::get <n>(tpl) }; return _tuple_index<(n < sizeof ...(T)-1 ? n+1 : 0 )>(tpl, i); } template <typename ... T>constexpr std::variant<T...> tuple_index (const std::tuple<T...>& tpl, size_t i) return _tuple_index<0 >(tpl, i); } template <typename T0, typename ... Ts>std::ostream & operator << (std::ostream & s, std::variant<T0, Ts...> const & v) { std::visit ([&](auto && x){ s << x;}, v); return s; }
这样我们就能:
1
2
int i = 1 ;std::cout << tuple_index (t, i) << std::endl;
元组合并与遍历
还有一个常见的需求就是合并两个元组,这可以通过 std::tuple_cat 来实现:
1 auto new_tuple = std::tuple_cat (get_student (1 ), std::move (t));
马上就能够发现,应该如何快速遍历一个元组?但是我们刚才介绍了如何在运行期通过非常数索引一个 tuple 那么遍历就变得简单了,首先我们需要知道一个元组的长度,可以:
1
2
3
4
template <typename T>auto tuple_len (T &tpl) return std::tuple_size<T>::value; }
这样就能够对元组进行迭代了:
1 2 3 4 for (int i = 0 ; i != tuple_len (new_tuple); ++i) std::cout << tuple_index (new_tuple, i) << std::endl;
Files
运行开始菜单的 “MSYS2 MinGW Clang x64”,运行下面命令进入项目目录。
1 cd /f/vscode/cpp_projects/modern-cpp-tutorial/code/4/
创建 4.3.tuples.cpp 文件,粘贴下面代码。
1 2 3 4 5 6 7 8 9 10 11 12 13 14 15 16 17 18 19 20 21 22 23 24 25 26 27 28 29 30 31 32 33 34 35 36 37 38 39 40 41 42 43 44 45 46 47 48 49 50 51 52 53 54 55 56 57 58 59 60 61 62 63 64 65 66 67 68 69 70 71 72 73 74 75 76 #include <tuple> #include <iostream> #include <variant> auto get_student (int id) if (id == 0 ) return std::make_tuple (3.8 , 'A' , "John" ); if (id == 1 ) return std::make_tuple (2.9 , 'C' , "Jack" ); if (id == 2 ) return std::make_tuple (1.7 , 'D' , "Ive" ); return std::make_tuple (0.0 , 'D' , "null" ); } template <size_t n, typename ... T>constexpr std::variant<T...> _tuple_index(const std::tuple<T...>& tpl, size_t i) { if constexpr (n >= sizeof ...(T)) throw std::out_of_range ("out of range." ) ; if (i == n) return std::variant<T...>{ std::in_place_index<n>, std::get <n>(tpl) }; return _tuple_index<(n < sizeof ...(T)-1 ? n+1 : 0 )>(tpl, i); } template <typename ... T>constexpr std::variant<T...> tuple_index (const std::tuple<T...>& tpl, size_t i) return _tuple_index<0 >(tpl, i); } template <typename T>auto tuple_len (T &tpl) return std::tuple_size<T>::value; } template <typename T0, typename ... Ts>std::ostream & operator << (std::ostream & s, std::variant<T0, Ts...> const & v) { std::visit ([&](auto && x){ s << x;}, v); return s; } int main () auto student = get_student (0 ); std::cout << "ID: 0, " << "GPA: " << std::get <0 >(student) << ", " << "Grade: " << std::get <1 >(student) << ", " << "Name: " << std::get <2 >(student) << '\n' ; double gpa; char grade; std::string name; std::tie (gpa, grade, name) = get_student (1 ); std::cout << "ID: 1, " << "GPA: " << gpa << ", " << "Grade: " << grade << ", " << "Name: " << name << '\n' ; std::tuple<std::string, double , double , int > t ("123" , 4.5 , 6.7 , 8 ) ; std::cout << std::get <std::string>(t) << std::endl; std::cout << std::get <3 >(t) << std::endl; auto new_tuple = std::tuple_cat (get_student (1 ), std::move (t)); for (int i = 0 ; i != tuple_len (new_tuple); ++i) { std::cout << tuple_index (new_tuple, i) << std::endl; } }
1
2
3
4
5
6
7
8
9
lyf@DESKTOP-GV2QHKN CLANG64 /f/vscode/cpp_projects/modern-cpp-tutorial/code/4 $ tree . ├── 4.1.linear.container.cpp ├── 4.2.unordered.map.cpp ├── 4.3.tuples.cpp └── Makefile 0 directories, 4 files
1
2
3
4
5
6
7
8
9
10
11
12
13
14
15
16
17
18
19
20
21
22
23
24
25
26
27
28
29
30
31
32
33
34
35
36
37
38
39
40
41
42
lyf@DESKTOP-GV2QHKN CLANG64 /f/vscode/cpp_projects/modern-cpp-tutorial/code/4 $ ls 4.1.linear.container.cpp 4.3.tuples.cpp 4.2.unordered.map.cpp Makefile lyf@DESKTOP-GV2QHKN CLANG64 /f/vscode/cpp_projects/modern-cpp-tutorial/code/4 $ make clang++ 4.1.linear.container.cpp -o 4.1.linear.container.out -std=c++2a -pedantic clang++ 4.2.unordered.map.cpp -o 4.2.unordered.map.out -std=c++2a -pedantic clang++ 4.3.tuples.cpp -o 4.3.tuples.out -std=c++2a -pedantic lyf@DESKTOP-GV2QHKN CLANG64 /f/vscode/cpp_projects/modern-cpp-tutorial/code/4 $ ls 4.1.linear.container.cpp 4.2.unordered.map.out Makefile 4.1.linear.container.out 4.3.tuples.cpp 4.2.unordered.map.cpp 4.3.tuples.out lyf@DESKTOP-GV2QHKN CLANG64 /f/vscode/cpp_projects/modern-cpp-tutorial/code/4 $ ./4.3.tuples.out ID: 0, GPA: 3.8, Grade: A, Name: John ID: 1, GPA: 2.9, Grade: C, Name: Jack 123 8 2.9 C Jack 123 4.5 6.7 8 lyf@DESKTOP-GV2QHKN CLANG64 /f/vscode/cpp_projects/modern-cpp-tutorial/code/4 $ make clean rm *.out lyf@DESKTOP-GV2QHKN CLANG64 /f/vscode/cpp_projects/modern-cpp-tutorial/code/4 $ ls 4.1.linear.container.cpp 4.3.tuples.cpp 4.2.unordered.map.cpp Makefile lyf@DESKTOP-GV2QHKN CLANG64 /f/vscode/cpp_projects/modern-cpp-tutorial/code/4 $
总结
本章简单介绍了现代 C++ 中新增的容器,它们的用法和传统 C++ 中已有的容器类似,相对简单,可以根据实际场景丰富的选择需要使用的容器,从而获得更好的性能。
std::tuple 虽然有效,但是标准库提供的功能有限,没办法满足运行期索引和迭代的需求,好在我们还有其他的方法可以自行实现。
第 5 章 智能指针与内存管理
RAII 与引用计数
了解 Objective-C/Swift 的程序员应该知道引用计数的概念。引用计数这种计数是为了防止内存泄露而产生的。基本想法是对于动态分配的对象,进行引用计数,每当增加一次对同一个对象的引用,那么引用对象的引用计数就会增加一次,每删除一次引用,引用计数就会减一,当一个对象的引用计数减为零时,就自动删除指向的堆内存。
在传统 C++ 中,记得手动释放资源,总不是最佳实践。因为我们很有可能就忘记了去释放资源而导致泄露。所以通常的做法是对于一个对象而言,我们在构造函数的时候申请空间,而在析构函数(在离开作用域时调用)的时候释放空间,也就是我们常说的 RAII 资源获取即初始化技术。
凡事都有例外,我们总会有需要将对象在自由存储上分配的需求,在传统 C++ 里我们只好使用 new 和 delete 去记得对资源进行释放。而 C++11 引入了智能指针的概念,使用了引用计数的想法,让程序员不再需要关心手动释放内存。这些智能指针包括 std::shared_ptr/std::unique_ptr/std::weak_ptr,使用它们需要包含头文件 <memory>。
注意:引用计数不是垃圾回收,引用计数能够尽快收回不再被使用的对象,同时在回收的过程中也不会造成长时间的等待,更能够清晰明确的表明资源的生命周期。
std::shared_ptr
std::shared_ptr 是一种智能指针,它能够记录多少个 shared_ptr 共同指向一个对象,从而消除显式的调用 delete,当引用计数变为零的时候就会将对象自动删除。
但还不够,因为使用 std::shared_ptr 仍然需要使用 new 来调用,这使得代码出现了某种程度上的不对称。
std::make_shared 就能够用来消除显式的使用 new,所以 std::make_shared 会分配创建传入参数中的对象,并返回这个对象类型的 std::shared_ptr 指针。例如:
1 2 3 4 5 6 7 8 9 10 11 12 13 14 #include <iostream> #include <memory> void foo (std::shared_ptr<int > i) (*i)++; } int main () auto pointer = std::make_shared <int >(10 ); foo (pointer); std::cout << *pointer << std::endl; return 0 ; }
std::shared_ptr 可以通过 get() 方法来获取原始指针,通过 reset() 来减少一个引用计数,并通过 use_count() 来查看一个对象的引用计数。例如:
1
2
3
4
5
6
7
8
9
10
11
12
13
14
15
16
17
18
19
20
auto pointer = std::make_shared <int >(10 );auto pointer2 = pointer; auto pointer3 = pointer; int *p = pointer.get (); std::cout << "pointer.use_count() = " << pointer.use_count () << std::endl; std::cout << "pointer2.use_count() = " << pointer2.use_count () << std::endl; std::cout << "pointer3.use_count() = " << pointer3.use_count () << std::endl; pointer2.reset (); std::cout << "reset pointer2:" << std::endl; std::cout << "pointer.use_count() = " << pointer.use_count () << std::endl; std::cout << "pointer2.use_count() = " << pointer2.use_count () << std::endl; std::cout << "pointer3.use_count() = " << pointer3.use_count () << std::endl; pointer3.reset (); std::cout << "reset pointer3:" << std::endl; std::cout << "pointer.use_count() = " << pointer.use_count () << std::endl; std::cout << "pointer2.use_count() = " << pointer2.use_count () << std::endl; std::cout << "pointer3.use_count() = " << pointer3.use_count () << std::endl;
Files
运行开始菜单的 “MSYS2 MinGW Clang x64”,运行下面命令构建项目目录。
1
2
3
cd /f/vscode/cpp_projects/modern-cpp-tutorial/code/ mkdir 5 cd 5/
创建 5.1.shared.ptr.a.cpp 文件,粘贴下面代码。
1 2 3 4 5 6 7 8 9 10 11 12 13 14 15 16 17 18 19 20 21 22 23 24 25 26 27 28 29 30 31 32 33 34 35 36 37 38 39 40 41 42 43 44 #include <iostream> #include <memory> void foo (std::shared_ptr<int > i) (*i)++; } int main () auto pointer = std::make_shared <int >(10 ); auto pointer2 = pointer; auto pointer3 = pointer; foo (pointer); std::cout << *pointer << std::endl; int *p = pointer.get (); std::cout << "pointer.use_count() = " << pointer.use_count () << std::endl; std::cout << "pointer2.use_count() = " << pointer2.use_count () << std::endl; std::cout << "pointer3.use_count() = " << pointer3.use_count () << std::endl; pointer2.reset (); std::cout << "reset pointer2:" << std::endl; std::cout << "pointer.use_count() = " << pointer.use_count () << std::endl; std::cout << "pointer2.use_count() = " << pointer2.use_count () << std::endl; std::cout << "pointer3.use_count() = " << pointer3.use_count () << std::endl; pointer3.reset (); std::cout << "reset pointer3:" << std::endl; std::cout << "pointer.use_count() = " << pointer.use_count () << std::endl; std::cout << "pointer2.use_count() = " << pointer2.use_count () << std::endl; std::cout << "pointer3.use_count() = " << pointer3.use_count () << std::endl; std::cout << *pointer << std::endl; return 0 ; }
创建 Makefile 文件,粘贴下面代码。
1 2 3 4 5 6 7 8 9 10 all: $(patsubst %.cpp, %.out, $(wildcard *.cpp)) %.out: %.cpp Makefile clang++ $< -o $@ -std=c++2a -pedantic clean: rm *.out
1
2
3
4
5
6
7
lyf@DESKTOP-GV2QHKN CLANG64 /f/vscode/cpp_projects/modern-cpp-tutorial/code/5 $ tree . ├── 5.1.shared.ptr.a.cpp └── Makefile 0 directories, 2 files
1
2
3
4
5
6
7
8
9
10
11
12
13
14
15
16
17
18
19
20
21
22
23
24
25
26
27
28
29
30
31
32
33
34
35
36
37
38
lyf@DESKTOP-GV2QHKN CLANG64 /f/vscode/cpp_projects/modern-cpp-tutorial/code/5 $ ls 5.1.shared.ptr.a.cpp Makefile lyf@DESKTOP-GV2QHKN CLANG64 /f/vscode/cpp_projects/modern-cpp-tutorial/code/5 $ make clang++ 5.1.shared.ptr.a.cpp -o 5.1.shared.ptr.a.out -std=c++2a -pedantic lyf@DESKTOP-GV2QHKN CLANG64 /f/vscode/cpp_projects/modern-cpp-tutorial/code/5 $ ls 5.1.shared.ptr.a.cpp 5.1.shared.ptr.a.out Makefile lyf@DESKTOP-GV2QHKN CLANG64 /f/vscode/cpp_projects/modern-cpp-tutorial/code/5 $ ./5.1.shared.ptr.a.out 11 pointer.use_count() = 3 pointer2.use_count() = 3 pointer3.use_count() = 3 reset pointer2: pointer.use_count() = 2 pointer2.use_count() = 0 pointer3.use_count() = 2 reset pointer3: pointer.use_count() = 1 pointer2.use_count() = 0 pointer3.use_count() = 0 11 lyf@DESKTOP-GV2QHKN CLANG64 /f/vscode/cpp_projects/modern-cpp-tutorial/code/5 $ make clean rm *.out lyf@DESKTOP-GV2QHKN CLANG64 /f/vscode/cpp_projects/modern-cpp-tutorial/code/5 $ ls 5.1.shared.ptr.a.cpp Makefile lyf@DESKTOP-GV2QHKN CLANG64 /f/vscode/cpp_projects/modern-cpp-tutorial/code/5 $
std::unique_ptr
std::unique_ptr 是一种独占的智能指针,它禁止其他智能指针与其共享同一个对象,从而保证代码的安全:
1 2 std::unique_ptr<int > pointer = std::make_unique <int >(10 ); std::unique_ptr<int > pointer2 = pointer;
make_unique 并不复杂,C++11 没有提供 std::make_unique,可以自行实现:
1
2
3
4
template <typename T, typename ...Args>std::unique_ptr<T> make_unique ( Args&& ...args ) { return std::unique_ptr <T>( new T ( std::forward<Args>(args)... ) ); }
至于为什么没有提供,C++ 标准委员会主席 Herb Sutter 在他的博客 中提到原因是因为被他们忘记了。
既然是独占,换句话说就是不可复制。但是,我们可以利用 std::move 将其转移给其他的 unique_ptr,例如:
1 2 3 4 5 6 7 8 9 10 11 12 13 14 15 16 17 18 19 20 21 22 23 24 25 26 27 28 29 30 31 32 33 34 #include <iostream> #include <memory> struct Foo { Foo () { std::cout << "Foo::Foo" << std::endl; } ~Foo () { std::cout << "Foo::~Foo" << std::endl; } void foo () "Foo::foo" << std::endl; } }; void f (const Foo &) std::cout << "f(const Foo&)" << std::endl; } int main () std::unique_ptr<Foo> p1 (std::make_unique<Foo>()) ; if (p1) p1->foo (); { std::unique_ptr<Foo> p2 (std::move(p1)) ; f (*p2); if (p2) p2->foo (); if (p1) p1->foo (); p1 = std::move (p2); if (p2) p2->foo (); std::cout << "p2 被销毁" << std::endl; } if (p1) p1->foo (); }
Files
运行开始菜单的 “MSYS2 MinGW Clang x64”,运行下面命令进入项目目录。
1 cd /f/vscode/cpp_projects/modern-cpp-tutorial/code/5/
创建 5.2.unique.ptr.cpp 文件,粘贴下面代码。
1 2 3 4 5 6 7 8 9 10 11 12 13 14 15 16 17 18 19 20 21 22 23 24 25 26 27 28 29 30 31 32 33 34 35 36 37 38 39 40 41 42 43 #include <iostream> #include <memory> struct Foo { Foo () { std::cout << "Foo::Foo" << std::endl; } ~Foo () { std::cout << "Foo::~Foo" << std::endl; } void foo () "Foo::foo" << std::endl; } }; void f (const Foo &) std::cout << "f(const Foo&)" << std::endl; } int main () std::unique_ptr<Foo> p1 (std::make_unique<Foo>()) ; if (p1) p1->foo (); { std::unique_ptr<Foo> p2 (std::move(p1)) ; f (*p2); if (p2) p2->foo (); if (p1) p1->foo (); p1 = std::move (p2); if (p2) p2->foo (); std::cout << "p2 was destroyed" << std::endl; } if (p1) p1->foo (); }
1
2
3
4
5
6
7
8
lyf@DESKTOP-GV2QHKN CLANG64 /f/vscode/cpp_projects/modern-cpp-tutorial/code/5 $ tree . ├── 5.1.shared.ptr.a.cpp ├── 5.2.unique.ptr.cpp └── Makefile 0 directories, 3 files
1
2
3
4
5
6
7
8
9
10
11
12
13
14
15
16
17
18
19
20
21
22
23
24
25
26
27
28
29
30
31
32
33
34
lyf@DESKTOP-GV2QHKN CLANG64 /f/vscode/cpp_projects/modern-cpp-tutorial/code/5 $ ls 5.1.shared.ptr.a.cpp 5.2.unique.ptr.cpp Makefile lyf@DESKTOP-GV2QHKN CLANG64 /f/vscode/cpp_projects/modern-cpp-tutorial/code/5 $ make clang++ 5.1.shared.ptr.a.cpp -o 5.1.shared.ptr.a.out -std=c++2a -pedantic clang++ 5.2.unique.ptr.cpp -o 5.2.unique.ptr.out -std=c++2a -pedantic lyf@DESKTOP-GV2QHKN CLANG64 /f/vscode/cpp_projects/modern-cpp-tutorial/code/5 $ ls 5.1.shared.ptr.a.cpp 5.2.unique.ptr.cpp Makefile 5.1.shared.ptr.a.out 5.2.unique.ptr.out lyf@DESKTOP-GV2QHKN CLANG64 /f/vscode/cpp_projects/modern-cpp-tutorial/code/5 $ ./5.2.unique.ptr.out Foo::Foo Foo::foo f(const Foo&) Foo::foo p2 was destroyed Foo::foo Foo::~Foo lyf@DESKTOP-GV2QHKN CLANG64 /f/vscode/cpp_projects/modern-cpp-tutorial/code/5 $ make clean rm *.out lyf@DESKTOP-GV2QHKN CLANG64 /f/vscode/cpp_projects/modern-cpp-tutorial/code/5 $ ls 5.1.shared.ptr.a.cpp 5.2.unique.ptr.cpp Makefile lyf@DESKTOP-GV2QHKN CLANG64 /f/vscode/cpp_projects/modern-cpp-tutorial/code/5 $
std::weak_ptr
如果你仔细思考 std::shared_ptr 就会发现依然存在着资源无法释放的问题。看下面这个例子:
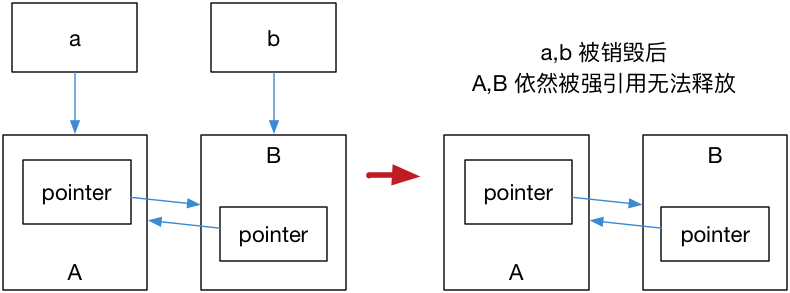
1
2
3
4
5
6
7
8
9
10
11
12
13
14
15
16
17
18
19
20
21
struct A ;struct B ;struct A { std::shared_ptr<B> pointer; ~A () { std::cout << "A 被销毁" << std::endl; } }; struct B { std::shared_ptr<A> pointer; ~B () { std::cout << "B 被销毁" << std::endl; } }; int main () auto a = std::make_shared <A>(); auto b = std::make_shared <B>(); a->pointer = b; b->pointer = a; }
运行结果是 A,B 都不会被销毁,这是因为 a,b 内部的 pointer 同时又引用了 a,b,这使得 a,b 的引用计数均变为了 2,而离开作用域时,a,b 智能指针被析构,却只能造成这块区域的引用计数减一,这样就导致了 a,b 对象指向的内存区域引用计数不为零,而外部已经没有办法找到这块区域了,也就造成了内存泄露,如下图:
解决这个问题的办法就是使用弱引用指针 std::weak_ptr,std::weak_ptr 是一种弱引用(相比较而言 std::shared_ptr 就是一种强引用)。弱引用不会引起引用计数增加,当换用弱引用时候,最终的释放流程如下图所示:
在上图中,最后一步只剩下 B,而 B 并没有任何智能指针引用它,因此这块内存资源也会被释放。
std::weak_ptr 没有 * 运算符和 -> 运算符,所以不能够对资源进行操作,它可以用于检查 std::shared_ptr 是否存在,其 expired() 方法能在资源未被释放时,会返回 false,否则返回 true;除此之外,它也可以用于获取指向原始对象的 std::shared_ptr 指针,其 lock() 方法在原始对象未被释放时,返回一个指向原始对象的 std::shared_ptr 指针,进而访问原始对象的资源,否则返回 nullptr。
Files
运行开始菜单的 “MSYS2 MinGW Clang x64”,运行下面命令进入项目目录。
1 cd /f/vscode/cpp_projects/modern-cpp-tutorial/code/5/
创建 5.3.weak.ptr.cpp 文件,粘贴下面代码。
1 2 3 4 5 6 7 8 9 10 11 12 13 14 15 16 17 18 19 20 21 22 23 24 25 26 27 28 29 30 31 32 33 34 #include <iostream> #include <memory> class A ;class B ;class A {public : std::weak_ptr<B> pointer; ~A () { std::cout << "A was destroyed" << std::endl; } }; class B {public : std::shared_ptr<A> pointer; ~B () { std::cout << "B was destroyed" << std::endl; } }; int main () std::shared_ptr<A> a = std::make_shared <A>(); std::shared_ptr<B> b = std::make_shared <B>(); a->pointer = b; b->pointer = a; return 0 ; }
1
2
3
4
5
6
7
8
9
lyf@DESKTOP-GV2QHKN CLANG64 /f/vscode/cpp_projects/modern-cpp-tutorial/code/5 $ tree . ├── 5.1.shared.ptr.a.cpp ├── 5.2.unique.ptr.cpp ├── 5.3.weak.ptr.cpp └── Makefile 0 directories, 4 files
1
2
3
4
5
6
7
8
9
10
11
12
13
14
15
16
17
18
19
20
21
22
23
24
25
26
27
28
29
30
31
32
33
lyf@DESKTOP-GV2QHKN CLANG64 /f/vscode/cpp_projects/modern-cpp-tutorial/code/5 $ ls 5.1.shared.ptr.a.cpp 5.3.weak.ptr.cpp 5.2.unique.ptr.cpp Makefile lyf@DESKTOP-GV2QHKN CLANG64 /f/vscode/cpp_projects/modern-cpp-tutorial/code/5 $ make clang++ 5.1.shared.ptr.a.cpp -o 5.1.shared.ptr.a.out -std=c++2a -pedantic clang++ 5.2.unique.ptr.cpp -o 5.2.unique.ptr.out -std=c++2a -pedantic clang++ 5.3.weak.ptr.cpp -o 5.3.weak.ptr.out -std=c++2a -pedantic lyf@DESKTOP-GV2QHKN CLANG64 /f/vscode/cpp_projects/modern-cpp-tutorial/code/5 $ ls 5.1.shared.ptr.a.cpp 5.2.unique.ptr.out Makefile 5.1.shared.ptr.a.out 5.3.weak.ptr.cpp 5.2.unique.ptr.cpp 5.3.weak.ptr.out lyf@DESKTOP-GV2QHKN CLANG64 /f/vscode/cpp_projects/modern-cpp-tutorial/code/5 $ ./5.3.weak.ptr.out B was destroyed A was destroyed lyf@DESKTOP-GV2QHKN CLANG64 /f/vscode/cpp_projects/modern-cpp-tutorial/code/5 $ make clean rm *.out lyf@DESKTOP-GV2QHKN CLANG64 /f/vscode/cpp_projects/modern-cpp-tutorial/code/5 $ ls 5.1.shared.ptr.a.cpp 5.3.weak.ptr.cpp 5.2.unique.ptr.cpp Makefile lyf@DESKTOP-GV2QHKN CLANG64 /f/vscode/cpp_projects/modern-cpp-tutorial/code/5 $
总结
智能指针这种技术并不新奇,在很多语言中都是一种常见的技术,现代 C++ 将这项技术引进,在一定程度上消除了 new/delete 的滥用,是一种更加成熟的编程范式。
进一步阅读的参考资料
stackoverflow 上关于『C++11为什么没有 make_unique』的讨论
结语
第二十四篇博文写完,开心!!!!
今天,也是充满希望的一天。


 wechat
 alipay


.png)